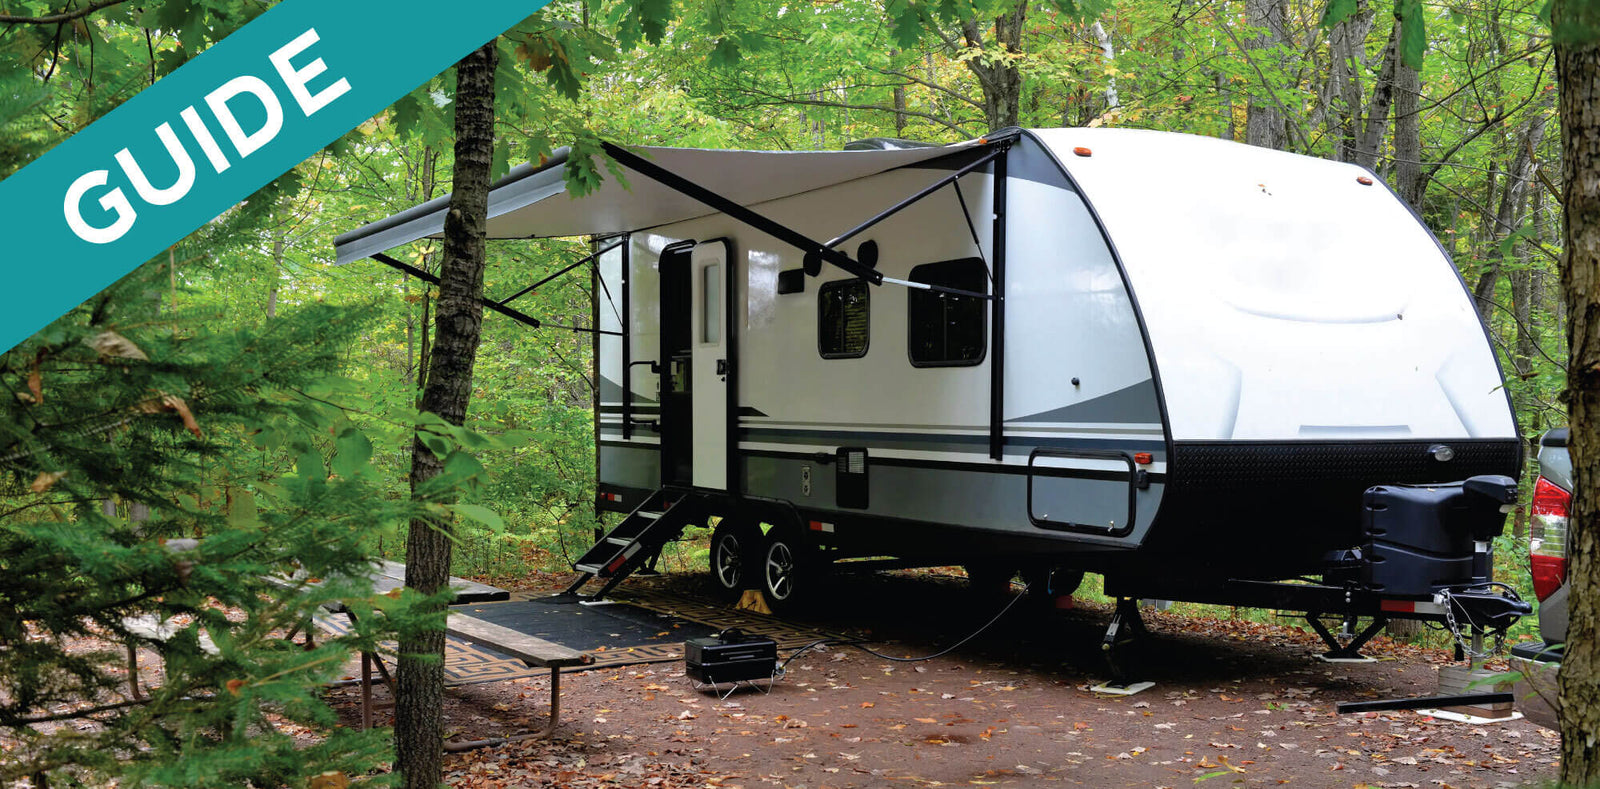


Whether you’re already battling odors in your RV, or are simply trying to prevent a stinky situation, your RV’s sewer system may be a constant source of worry. However, there is one main way you can keep odors and lingering stress at bay during your next camping trip.
If you’re keeping your RV gray water holding tank open while hooked up to a campground septic system, you may want to consider adding a p-trap to your RV sewer discharge hose.
In this guide, we’ll be covering how p-traps work to block odors, why adding a p-trap to your RV sewer hose can be effective, and step-by-step instructions for p-trap set up.
Important Note: If you’re boondocking, or not connected to hookups, you should always keep your RV holding tank valves closed when not actively dumping, so this guide will not apply. Instead, we recommend reviewing our guide: Treating Your RV Holding Tanks While Dry Camping
Key Points About Adding a P-Trap to an RV Sewer Hose
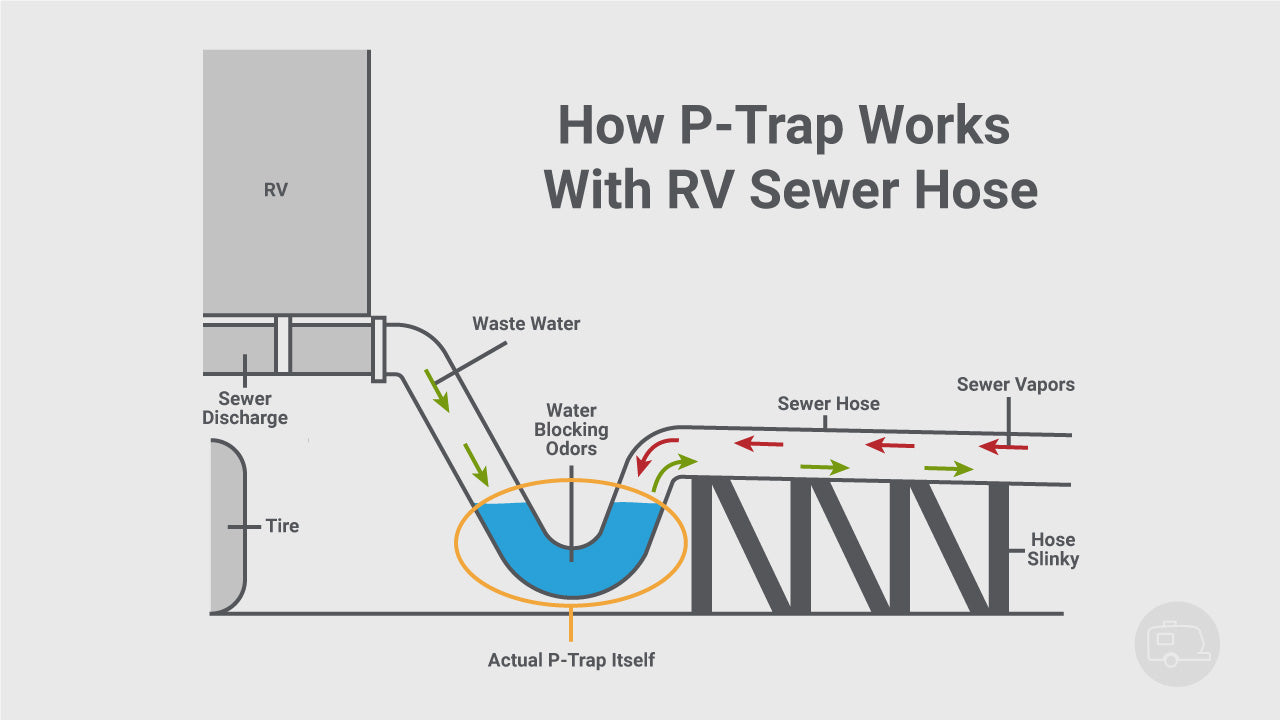
- P-traps do more than catch debris that falls down sink drains, in fact, their primary purpose is to block sewer gases from rising up into your RV’s living space.
- If you’re camping on hookups with your gray tank valve open, adding a p-trap in your RV sewer discharge hose can help prevent foul odors. Remember, black tank valves should always be kept closed (except when actively dumping) to prevent clogs and pyramid plugs.
- Adding a p-trap to your RV sewer hose is simple and easy, and only requires elevating your RV discharge hose enough to create the p-trap.
- P-trap positioning is important during setup, because you have to ensure the dip in the hose is deep enough to completely fill with liquid in order to block gases effectively.
What is a P-Trap?
A p-trap is a simple piece of plumbing that is named after its shape, which looks like a “p” that’s been tipped on its side. The bend in the pipe intentionally traps debris that falls down your sink to help prevent clogs, but also acts as a barrier between drains and sewer gases.

How P-Traps Help Prevent Odors Inside Your RV
When you keep your RV gray holding tank valve open, it allows water to flow directly from your RV into the main sewer drain that is connected to a septic system, but can also allow sewer gases to rise up and waft into your RV.
Air pressure in a campground septic system can push smelly gases from the sewer system up your discharge hose and into your gray tank. These noxious sewer gases often smell like grease or garlic, not always like poop or urine, which can be a key indicator that you may be dealing with sewer gas.
As long as your sink, shower, and appliance p-traps still have water in them, they should stop the majority of odors from rising into your RV. However, if one of these fixtures isn’t used for a period of time (perhaps a shower you don’t use in your fifth wheel), and the p-trap is allowed to dry out, you no longer have a water barrier to block foul odors.
Creating a p-trap in your RV discharge hose works the same way a p-trap works in your sink, and creates an additional layer of protection to prevent unpleasant odors from seeping into your RV while your gray holding tank valve is open.
Important Note: We recommend keeping your black holding tank valve closed unless you are dumping your tanks, even when at a full hookup site. For more information about how to use your RV valves correctly, consider reading our guides:
- Why It’s Crucial to Keep Your RV Black Water Valve Closed
- The Definitive Guide to Using Your RV Waste Water Valves
Benefits of Adding a P-Trap to Your RV Discharge Hose
Now that you know how adding a p-trap to your RV discharge hose works, let’s take a closer look at the benefits it can provide.
Key advantages to adding a p-trap to your RV discharge hose include:
- Increases convenience while using appliances that require high water usage, like washers and dishwashers, and even makes longer showers possible.
- Establishes an additional water barrier for increased odor control management in your RV.
- Helps prevent campground sewer gases from backing up into your gray water holding tank and seeping out of your tank vents.
- Reduces the chances that drain flies and other insects will travel up the sewer discharge hose and into your gray water holding tank.
By adding a p-trap to your RV discharge hose, you are taking one important step toward a fresher-smelling RV. However, your sewer discharge hose is only one component of your RV sewer management system. Proper care of your RV black and gray tanks is crucial for preventing odors and enjoying worry-free road trips.
We’ve been solving RV wastewater issues for over 30 years, and through those experiences we developed The Unique Method. This simple set of guidelines involves using the right process and the right products to solve 99% of your wastewater problems before they even occur.
When Installing a P-Trap to Your RV Discharge Hose May Not Be Helpful
While adding a p-trap to your RV discharge hose is certainly beneficial, there are times when adding one may not be appropriate.
Situations when you should skip adding a p-trap to your RV discharge hose:
- If you’re routinely camping with your gray tank valve closed, you already have a solid barrier between the campground sewer and your camper. Adding a p-trap to your RV discharge in this instance would simply be redundant.
- Adding a p-trap to your RV discharge hose requires having space beside your RV and a downward slope in order for it to be effective. This may not be possible in all campgrounds and locations.
- Certain campgrounds require that all parts of the RV discharge hose, including the p-trap, should be elevated above the ground, which can make this technique more difficult to execute.
- When you arrive at a campsite, if you open the sewer port and find evidence of a sewer fly infestation (the most likely place to find them), we recommend keeping your gray tank valve closed to prevent them from reaching the inside of your RV.
Always make sure to consider your specific situation before attempting to add a p-trap to your RV discharge hose. While it can be very beneficial, it is important to adjust your habits based on your individual needs, and to adhere to all campground rules and regulations.
Step-By-Step Guide to Add an RV Discharge Hose P-Trap
Setting up an RV discharge hose p-trap is a simple and easy way to prevent foul odors from the campground main sewer drain from making it into your RV. Let’s get started.
1. Check Campground Rules & Requirements
Before getting started, check the campground rules for RV sewer drain hose requirements. For example, some sites prohibit any part of the drain hose from touching the ground. Other rules may include using a watertight seal, ensuring an appropriate downward slope, and not putting your sewer hose on the camp picnic tables.
2. Wear Protective Gloves
Putting on disposable gloves is a smart practice before handling your RV sewer discharge hose. It keeps you and your family protected from unsanitary bacteria and pathogens.
3. Setup Your RV Discharge Hose Support
Begin by setting up the RV discharge hose support between your camper and the sewer port. RVers often use a commercial slinky, or a homemade RV discharge hose support made from logs, bricks, or other materials.
The purpose of the support is to keep the RV sewer hose off the ground, reduce wear and tear while creating the downward slope toward the sewer hookup, and allowing gravity to work in your favor.

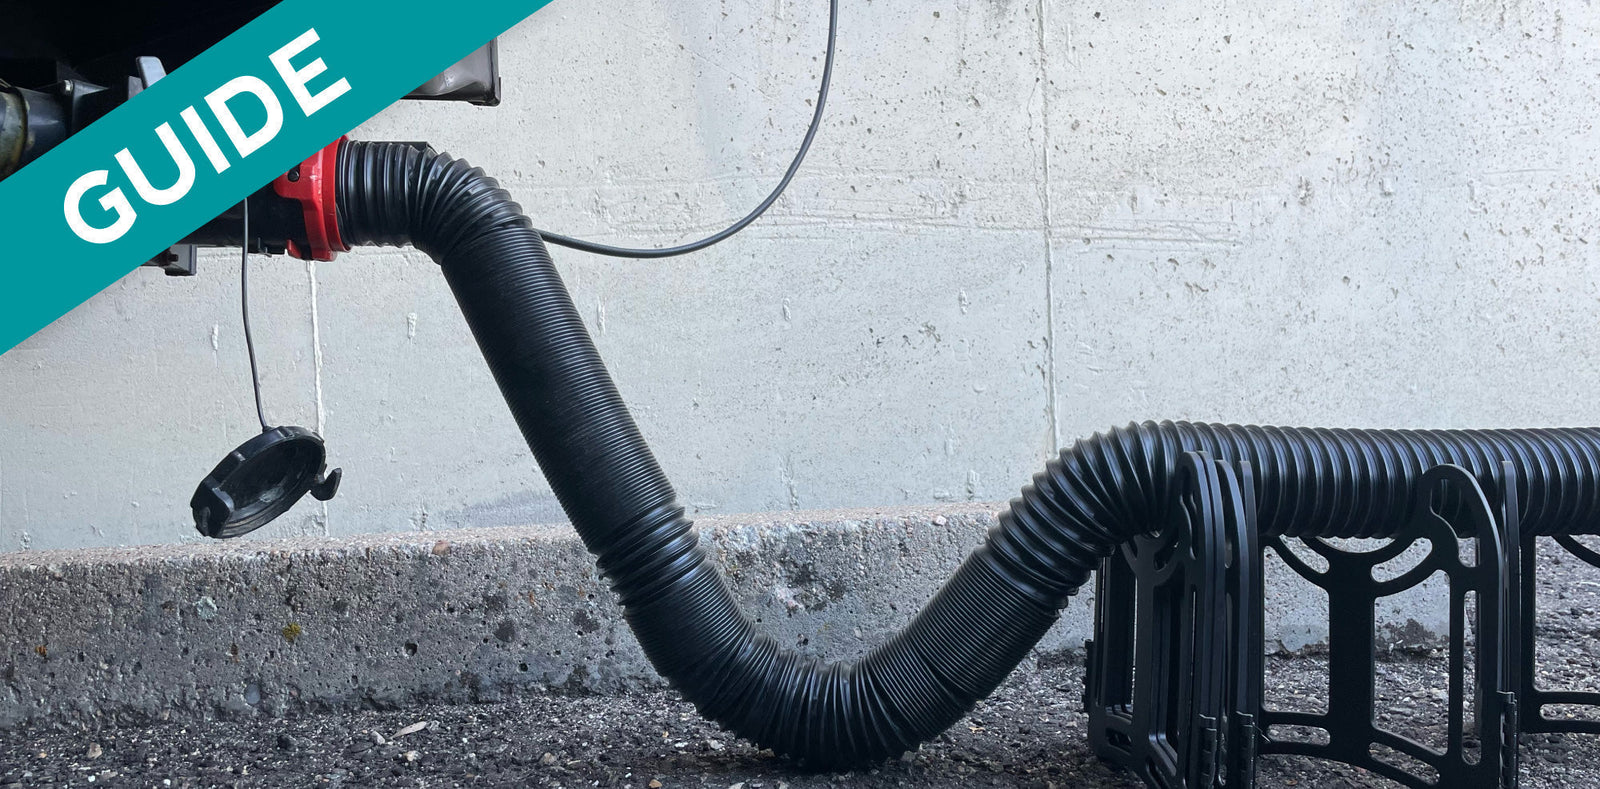
4. Connect Your RV Discharge Hose & Create P-Trap
Once your support is set up, you can add your RV discharge hose, leaving slack in the hose next to the RV. You’ll use the extra slack to create the “P” part of the trap.
To create the dropped part of the hose, dip the hose below and then back onto the hose support, ensuring that the top of the “P” dips fully below the rest of the hose so that it will fill with water. If you don’t feel confident adding the p-trap part yourself, or if you want a more convenient way to add it, the Morryde RV Snap Trap is specifically designed to make the bend in the sewer hose for you.

5. Check the RV Discharge Hose P-Trap
To ensure that you have a good water barrier, you can check the p-trap in two ways:
First, you can fill the p-trap section of the RV discharge hose with water before attaching the bayonet end of the sewer hose to the RV discharge port.
When you do this, make sure the other end of the hose is securely placed into the sewer port, preferably with a weight on it to ensure it does not move when the liquid flows through it. Pour half a gallon of water (8 cups) into the hose end closest to your RV.

Alternatively, you can hook up to the main sewer, open your gray tank valve, and run water in your sink until water has filled the p-trap.
Using one of these methods, you should be able to confirm that you’ve positioned the RV discharge hose support, the hose itself, and the p-trap in a position that will allow the p-trap to hold water as intended.
6. Use Your RV Plumbing Normally
Once your RV sewer hose p-trap is set up, proceed using your plumbing as you normally would while on a campground septic hookup, leaving your gray water holding tank open. The water in the p-trap should now act as a vapor barrier that will prevent foul odors from rising up from the sewer into your RV.
7. Dumping Your RV Black Tank With an RV Discharge Hose P-Trap
When it comes time to dump your black water holding tank, fill your gray tank up with water (if your gray tank valve has been left in the "open" position) so you can rinse out your discharge lines after you dump your black tank.
You can do this by rapidly filling your gray tank right before dumping your black tank, or you can simply close your gray tank several hours before you intend to dump your black tank and let it fill naturally.
Before dumping your black tank, remove the p-trap from the RV discharge hose with these two methods:
Dumping & Staying at Campsite
Remove the p-trap by straightening the hose before doing your holding tank cleanout chores. Once you’ve finished dumping and flushing your tanks, follow the steps 2-6 above to add the p-trap back to the RV discharge hose.
Dumping & Leaving the Campsite
Remove the p-trap bend before dumping the black tank, followed by the gray tank. Once you have dumped the holding tanks one at a time, close each valve after dumping each tank to ensure you do not get black water flowing into the gray water tank.
When both tanks are empty, and both valves are closed, disconnect the sewer hose from the bayonet fitting from the RV. Hold the sewer hose aloft and walk towards the sewer port while collapsing the hose, preventing it from dragging on the ground.
As you lift the hose, you will be moving liquid that is lingering in the sewer hose to the sewer port drain. This will keep you from making a mess when collecting the sewer hose.
For specific instructions about dumping your RV holding tanks, review our guides:
- How to Dump Your RV Black and Gray Water Holding Tanks
- Why You Should Flush RV Holding Tanks After Dumping
Bottom Line: Add a P-Trap to Your RV Discharge Hose For a Fresher Experience
If you’re an RVer who keeps your gray water holding tank continuously open at campgrounds, adding a p-trap to your RV sewer discharge hose can provide an additional layer of odor protection, while also helping to reduce drain flies migrating from the campground sewer up into your sink and shower drains.
While an RV discharge hose p-trap may not be the right solution for everyone, many people find that it works well when keeping gray water tanks open to campground septic systems.
If you have questions about adding a p-trap to your RV discharge hose, or have other questions about your RV’s wastewater system, reach out to the helpful Customer Service Team at Unique Camping + Marine for expert advice and tips.

Prevent Common Problems In Your Tanks!
From misreading sensors, preventing clogs, or eliminating odors, we've got you covered no matter how you camp! All our best holding tank tips and trick information plus more can be found conveniently in one place when you download our FREE Unique Method Field Guide PDF. Achieve holding tank bliss today!
Get The Free Download Get The Free Download